To get a study permit for Canada, you absolutely need a letter of acceptance from a Designated Learning Institution, solid proof of financial support to cover your first year, and in most cases, a new document called a Provincial Attestation Letter (PAL) or Territorial Attestation Letter (TAL). These are the non-negotiables that prove you’re a legitimate student ready to study here.
2026 PAL/TAL update: IRCC says a PAL/TAL is usually required for study permit applications unless an exemption applies. Starting January 1, 2026, master’s and doctoral students enrolled at public DLIs are exempt from the PAL/TAL requirement. IRCC also expects to issue up to 408,000 study permits in 2026, including 180,000 for PAL/TAL-required applicants, with Ontario allocated 70,074 expected permits for those cohorts.
Understanding Your Canadian Study Permit Journey
So, you’re ready to start your educational journey in Canada. The first thing you need to wrap your head around is the study permit. It’s a common mistake to think of it as a visa that gets you into the country. Instead, think of it as your official permission slip to actually enrol and study at a Canadian school once you arrive. Getting a handle on the study permit requirements is your very first step to a successful application.
The Three Pillars of a Successful Application
Your entire case with Immigration, Refugees and Citizenship Canada (IRCC) is built on three core pillars. An immigration officer needs to be completely satisfied with all three before they’ll even consider approving your permit.
- A Valid Letter of Acceptance (LOA): This is your golden ticket from a Designated Learning Institution (DLI). It’s the official document proving you’ve been accepted into a programme and have a genuine reason to come to Canada.
- Solid Proof of Financial Support: You must show you have the money to pay for your first year of tuition, your travel, and your living expenses. The government has set this at a minimum of $20,635 for a single student, on top of tuition fees.
- Genuine Temporary Resident Intent: This is a big one. You have to convince the officer that you’ll respect the rules of your stay and will leave Canada when your studies are finished.
A study permit application is more than just a pile of paperwork; it’s a story you tell an immigration officer. Each document must work together to create a clear, credible, and convincing picture of your intentions as a student in Canada.
Navigating the New Landscape
Things have gotten a lot more competitive recently. The Canadian government has introduced a national cap on new study permits, which means that even fully qualified applicants aren’t guaranteed an approval anymore. On top of that, if you’re planning to study in Ontario or most other provinces, there’s a major new hurdle to clear.
This new requirement is the Provincial Attestation Letter (PAL). It’s a document from the provincial government confirming you have a spot under its specific allocation of students. Don’t worry, you don’t apply for this yourself; your DLI is responsible for getting it for you once they’ve accepted you.
These changes mean that a perfectly prepared application isn’t just a good idea—it’s essential. With a more selective system in place, understanding the nuances of Canadian immigration law has never been more critical to giving yourself the best chance of success.
2026 PAL/TAL Rules for Ontario Study Permit Applicants

IRCC’s 2026 study permit rules make the attestation question more important than ever. A PAL/TAL confirms that the province or territory where you plan to study has space for your application within the federal cap system. In Ontario, your designated learning institution usually coordinates the PAL process; you should not submit first and hope the letter arrives later if your application requires one.
Who usually needs a PAL or TAL
Most post-secondary study permit applicants need a PAL/TAL unless they fall within an IRCC exemption. The safest step is to ask your DLI in writing whether your program requires a PAL/TAL and when the school will issue it. Keep that email or portal confirmation with your application records.
Key 2026 exemptions to check
IRCC lists several exemptions. For 2026, the most important new exemption is for degree-granting master’s or doctoral programs at public DLIs, starting January 1, 2026. Other exempt groups may include kindergarten-to-grade-12 students, certain exchange students, some Government of Canada priority groups, and existing study permit holders applying to extend at the same DLI and same level of study. If you claim an exemption, include proof rather than leaving the officer to guess.
Ontario allocation pressure
IRCC’s 2026 allocation notice says Canada expects up to 408,000 study permits in 2026 and up to 180,000 permits for PAL/TAL-required applicants. Ontario’s expected 2026 PAL/TAL-required permit target is 70,074, with a larger application allocation because not every application is approved. That does not mean every Ontario applicant is at risk, but it does mean weak applications have less room for error.
Refusal risks after the 2026 changes
A PAL/TAL does not guarantee approval. Officers can still refuse if the study plan is unclear, funds are weak, the program does not fit the applicant’s background, documents are inconsistent, or temporary resident intent is not persuasive. A strong application connects the LOA, PAL/TAL, finances, career plan and home-country ties into one coherent story.
Assembling Your Core Application Documents

Think of your study permit application like a puzzle. Each document is a critical piece, and if one is missing or doesn’t fit right, the whole picture falls apart. Getting these core documents in order from the very beginning is the single most important thing you can do to build a solid case for Immigration, Refugees and Citizenship Canada (IRCC).
Every single paper has a job to do, from proving you’re a genuine student to verifying your identity. The officer reviewing your file needs to see a complete and logical package. Let’s break down the first three non-negotiable documents you’ll need: your Letter of Acceptance, the new Provincial Attestation Letter, and your proof of identity.
Your Golden Ticket: The Letter of Acceptance
The journey starts here. Your Letter of Acceptance (LOA) is the official proof from a Designated Learning Institution (DLI) that you have a real reason to be in Canada. This isn’t just an admissions email; it’s a formal document that an immigration officer will examine closely to make sure your school, programme, and student status are all legitimate.
Make sure your LOA is from a school on the official DLI list and that it clearly specifies:
- Your full name, date of birth, and mailing address.
- The institution’s name and its official DLI number.
- The exact programme of study, its level (e.g., diploma, bachelor’s degree), and how long it will take.
- The start date and the expected end date of your programme.
- Any conditions tied to your acceptance, like needing to pass an English test first.
A vague or incomplete LOA is a massive red flag for IRCC. Before you do anything else, check that every detail is on that letter and is 100% accurate.
The New Gatekeeper: The Provincial Attestation Letter
For most students, there’s a new and crucial document in the mix: the Provincial Attestation Letter (PAL). As of 2024, if you’re applying for most undergraduate or college programmes, you now need a PAL from the province where your school is located. This letter proves that you have a spot that fits within that province’s new cap on international students.
The PAL system was introduced to help provinces manage the number of international students and ensure there are enough resources to support them. Your school is responsible for getting this letter for you after you accept their offer of admission—you don’t apply for it yourself.
Put simply, if you need a PAL and don’t include it, your application will be sent right back to you. You absolutely must confirm with your DLI that they will provide it and then wait to get it in hand before you submit your application to IRCC. This is one of the most important study permit Canada requirements for the majority of new applicants.
Proving Who You Are: Identity Documents
Finally, you have to provide undeniable proof of who you are. This comes down to two things: your passport and your biometrics.
Your passport needs to be valid not just for your flight to Canada, but ideally for the entire time you plan to be studying. A passport that expires halfway through your degree can cause a real headache, forcing you to scramble for an extension from inside Canada. The smart move? Renew it before you apply to save yourself a lot of trouble later.
On top of that, most applicants must provide biometrics—your fingerprints and a photo. You’ll do this at an official Visa Application Centre (VAC) after submitting your application and paying the fee. Canada uses this information to confirm your identity when you arrive and to keep the immigration system secure.
Just as a study permit is your key to learning, a valid work permit is your key to employment. To better understand what that involves, you can check out our guide on Canadian work permit application requirements to help you plan your future.
Proving You Have Sufficient Financial Support

Time and again, we see applications get refused for one main reason: the applicant couldn’t convince the immigration officer they had enough money. This isn’t just about showing a big number in a bank account. It’s about telling a clear, believable story with your documents that proves you can handle the costs of living and studying here.
Think of it this way: an immigration officer is like a judge, and your financial paperwork is your evidence. A huge, unexplained deposit that appears in your account right before you apply? That’s like a witness with a shaky story—it raises more questions than it answers.
This is exactly why meeting the study permit Canada requirements for finances is so critical. Officers are trained to spot inconsistencies and look for a logical source of funds. A stable financial history over several months is always more convincing than a last-minute scramble to hit the minimum.
Calculating the Exact Amount You Need
To get your application approved, you need to show you have enough money to cover three specific things for your first year in Canada. You can’t just guess—you have to meet or beat the official minimums set by Immigration, Refugees and Citizenship Canada (IRCC).
As of early 2024, the minimum amount you need for your own living expenses for one year is CAD $20,635. This number was updated to give a much more realistic picture of what it actually costs to live in Canada.
Here’s the simple formula to figure out your total:
- Your first year of tuition fees (this is on your Letter of Acceptance).
- Plus, $20,635 for your living expenses.
- Plus, enough money to cover your flight to Canada and back home.
If you’re bringing family, you’ll need to add more funds for each person. A clear calculation showing you have these costs covered is a non-negotiable step toward getting your permit.
Best Ways to Demonstrate Your Financial Capacity
Showing you have the money is just as important as having it. IRCC accepts a few different types of documents, but some are definitely stronger than others. Your goal is to provide official, verifiable proof that is simple for the officer to understand.
Your best options for proving your finances include:
- Bank Statements: You’ll want to provide statements from the past four to six months. This shows a consistent balance and proves the money is yours, not just a loan from a friend for the application.
- Guaranteed Investment Certificate (GIC): Buying a GIC for at least $20,635 from a participating Canadian bank is one of the most trusted methods. It shows you’ve already parked your living expense money in a secure Canadian account.
- Student Loan Approval Letter: A formal letter from a bank confirming your approved student loan is fantastic proof.
- Sponsorship Letters: If your parents or another sponsor are funding your studies, you need a formal letter from them. It has to be backed up by their own proof of financial stability, like their bank statements, pay stubs, and a letter from their employer.
With the recent changes and new caps on student numbers, getting a permit is more competitive than ever. The stakes are high, and a flawless financial submission is crucial.
Ultimately, your financial documents need to paint a complete picture of stability. This part of your application is foundational, and getting it right can even influence your chances of staying in the country down the road. For those thinking that far ahead, you can read our guide on how to apply for permanent residence to see what the future could hold.
Meeting Canada’s Health and Security Standards
So, you’ve got your acceptance letter and your finances sorted. That’s a huge step, but we’re not quite at the finish line. Every study permit application also needs to prove you’re admissible to Canada, which really just means you meet the country’s health and security standards.
Think of it as a final wellness and character check. Immigration, Refugees and Citizenship Canada (IRCC) needs assurance that you won’t pose a risk to public health or safety. To get this confirmation, they’ll ask most students to complete a few checks: a medical exam, security screening, and providing biometrics. Let’s walk through what each of these involves.
The Immigration Medical Exam
Not every student needs a medical exam, but it’s a common requirement. The whole point of the Immigration Medical Exam (IME) is to screen for health conditions that could be a danger to public health or put a major strain on Canada’s health or social services.
You’ll almost certainly need an IME if you’ve:
- Lived or travelled in certain countries for six months or more in the year before you apply.
- Planned to study in a field that puts you in close contact with people, like health sciences, clinical laboratory work, or primary education.
One thing to get right: you can’t just go to your family doctor. The exam must be done by an IRCC-approved panel physician. You can find one near you on the official IRCC website. You have two options here: get an “upfront medical exam” before you even apply (which can sometimes speed things up), or wait for IRCC to send you instructions after you’ve submitted your application.
Proving Your Good Character
Canada is serious about protecting its citizens, so every applicant goes through a security and criminality screening. For students, this usually means getting police certificates from countries where you’ve spent significant time.
A police certificate is just an official document showing your criminal record, or confirming you don’t have one. It’s how immigration officers check if your past makes you inadmissible to Canada.
You’ll need to get a police certificate from:
- Every single country or territory where you have lived for six or more months in a row since turning 18.
Be warned: getting these can take a while. Each country has its own process, so you’ll want to start this early. We’ve seen applications get held up for weeks because someone waited too long to request a certificate from a country they lived in years ago. It often involves contacting an embassy or a specific government agency, so plan ahead.
The Final Identity Check: Biometrics
The last piece of this puzzle is biometrics. This is simply where IRCC collects your fingerprints and a digital photo to confirm you are who you say you are. This data is used for background checks and to verify your identity every time you enter Canada.
Most people applying for a study permit have to provide biometrics. Here’s how it works: after you submit your application and pay the fees (including the separate biometrics fee), IRCC will send you a Biometric Instruction Letter (BIL). You need to take that letter to an official Visa Application Centre (VAC) to get your fingerprints and photo taken.
This isn’t an optional step—your application will sit in a queue, unprocessed, until you’ve done it. As soon as that BIL lands in your inbox, book your appointment at the nearest VAC. Getting these health and security checks done right is a non-negotiable part of a successful study permit application.
Crafting a Powerful Letter of Explanation
While it’s not always on the mandatory document checklist, a well-written Letter of Explanation (LOE) can easily become the most important part of your study permit application. This is your one and only chance to speak directly to the immigration officer, to put a human face on your file, and to connect all the dots for them. It’s not just another form—it’s your story.
Think of it from the officer’s perspective. They’re looking at your acceptance letter, bank statements, and passport. These are just pieces of paper. The LOE is what weaves them together into a coherent, believable narrative. A great letter can be the deciding factor between approval and refusal, especially when every detail counts.
Defining Your Purpose and Study Plan
At its core, your LOE needs to answer one big question for the officer: “Why this programme, at this school, in Canada?” A generic answer just won’t fly. You have to get specific and show them you’ve actually done your homework. This demonstrates a clear, logical plan for your education.
Your letter should break down:
- Why Canada? Maybe it’s Canada’s reputation for top-tier education in your field, unique research opportunities, or co-op programmes you can’t find anywhere else. Mention it.
- Why this institution? Name the specific professors you’re excited to learn from, the unique courses that caught your eye, or the school’s particular strengths that line up with your goals.
- Why this programme? This is key. You need to draw a straight line from your past education to this programme, and then from this programme to your future career back home.
An effective Letter of Explanation doesn’t just list facts; it builds a bridge. It connects your past experiences to your future ambitions, with your chosen Canadian study programme acting as the essential link between the two.
This is your shot to prove that your decision to study in Canada is a calculated, well-thought-out step in a much bigger life plan.
Demonstrating Strong Ties to Your Home Country
One of the biggest hurdles every applicant faces is proving temporary resident intent. The officer has to be 100% convinced that you will pack up and leave Canada once your studies are done. Your LOE is the perfect place to make that case by spelling out all the reasons you have to return home.
To do this right, you need to provide solid, concrete examples of your ties:
- Family Obligations: Talk about your role in your family. Are you caring for parents? Do you have a spouse or children staying behind who depend on you?
- Financial Assets: List any property, investments, or businesses you own back home. These are heavy anchors that show you aren’t likely to just walk away.
- Career Prospects: This is a big one. You need to paint a clear picture of the job opportunities waiting for you once you have a Canadian qualification. Get specific about companies, potential job titles, and even expected salary ranges to show you have a clear plan for after you graduate.
Since your Letter of Explanation is a key opportunity to convince authorities of your genuine intent, understanding how to write a persuasive essay can significantly bolster your application.
Addressing Potential Red Flags Proactively
A smart LOE anticipates the officer’s questions and answers them before they even have a chance to ask. If there’s anything unusual in your application, you need to address it directly. Ignoring a potential “red flag” just gives the officer a reason to doubt you and say no.
Be on the lookout for common issues like:
- Gaps in your education or work history.
- A previous visa or permit refusal from Canada or any other country.
- Choosing a programme that seems completely unrelated to your background.
- Large, recent deposits into your bank account.
For any of these, provide a short, honest, and logical explanation. If you have evidence to back it up, include it. This kind of transparency builds trust and shows the officer you’re a serious, straightforward applicant. With the government actively looking to reduce temporary resident numbers, a proactive and well-reasoned LOE is more critical than ever.
Navigating the Process After You Apply
So, you’ve hit the “submit” button on your study permit application. That’s a huge step, but the journey isn’t over yet. Now the waiting game begins, and knowing what’s happening behind the scenes can make all the difference for your peace of mind.
Once your application is in, it lands in the processing queue at Immigration, Refugees and Citizenship Canada (IRCC). How long it stays there can vary wildly depending on where you’re applying from, how many others are applying at the same time, and whether your case is straightforward or has some complexities. You can keep an eye on things through your secure IRCC online account, which will update as your file hits key milestones.
Understanding IRCC Timelines and Communication
Get into the habit of checking your IRCC account and your email religiously. If an officer needs more information to make a decision, they’ll send an Additional Document Request (ADR). These requests are always time-sensitive, so a quick and thorough response is critical to keep your application from stalling.
Don’t panic if you get an ADR. It isn’t necessarily a bad sign. Think of it as an opportunity: the officer is giving you a chance to clear up a doubt or strengthen a part of your application they found weak. Your best move is to respond promptly with exactly what they’ve asked for.
For a clearer picture of how long your specific application might take, have a look at our detailed guide on Canadian immigration processing times.
The core of a strong application is a convincing narrative, especially in your Letter of Explanation. You need to connect the dots for the officer, showing them why you’ve chosen your path and that you have a solid plan.
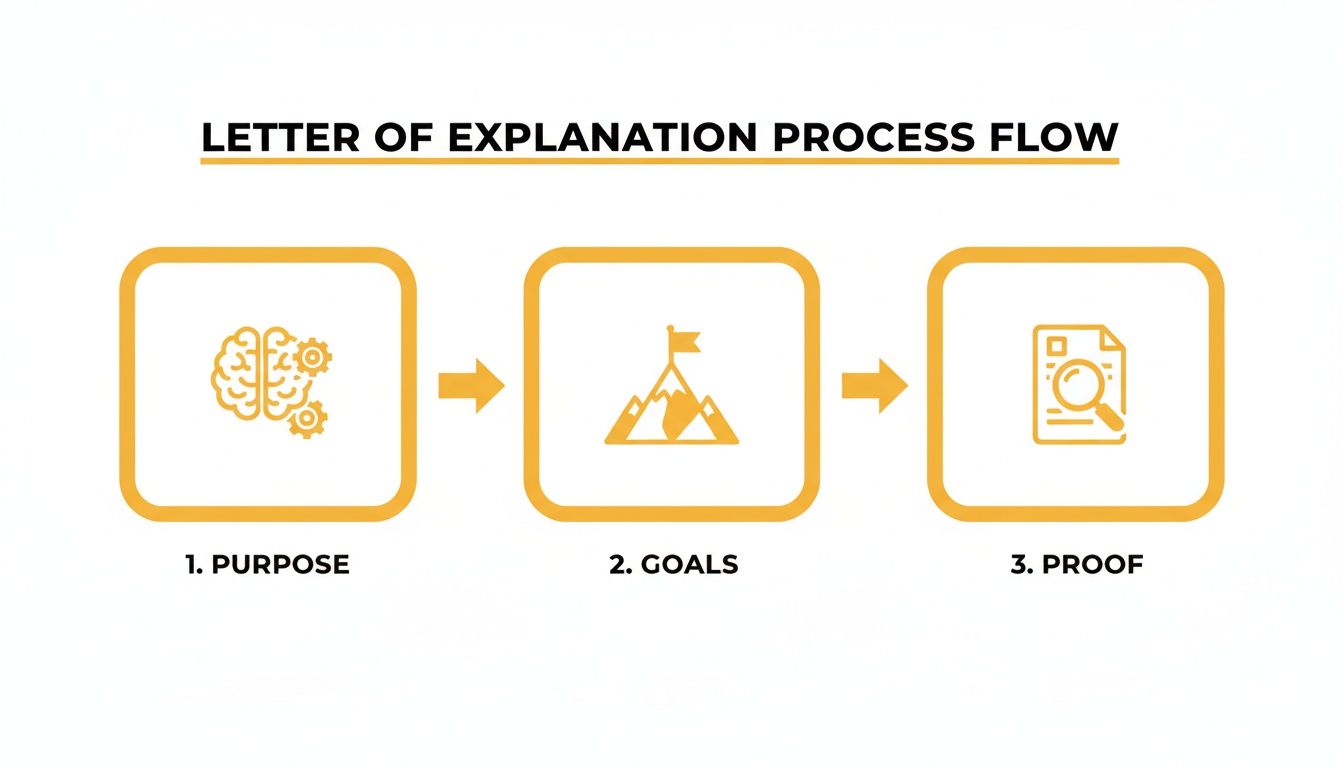
This visual really breaks it down: a clear purpose, tied to concrete goals, all backed up by solid proof, is what builds a persuasive case for the visa officer.
Approval or Refusal: What to Expect
In the end, every application gets one of two answers. If you’re approved, you won’t get the actual study permit in your email. Instead, you’ll receive a Port of Entry (POE) Letter of Introduction. You need to print this letter and present it to the Canada Border Services Agency (CBSA) officer when you land in Canada. They are the ones who will print and issue your official study permit.
If your application is refused, IRCC will send a letter explaining why. Read it carefully. Common reasons for refusal often circle back to not showing enough money to support yourself or the officer not being convinced you’ll leave Canada when your studies are done. This new landscape is more competitive than ever. In 2024, Canada introduced a cap which is expected to lead to a significant drop in study permit issuances from 2023 levels.
A refusal isn’t always the final word. You can often address the specific concerns raised by the officer and reapply with a much stronger application. In more complex cases, it might be time to get some professional legal advice to figure out the best path forward.
A Few More Questions We Often Hear
Even with all the pieces laid out, you might still have a few lingering questions. That’s completely normal. Let’s tackle some of the most common queries we get from students who are in the final stages of planning their Canadian adventure.
Can I Get a Job While I’m Studying in Canada?
Absolutely. Most full-time international students can work part-time. If your study permit says you’re allowed to work, you can clock in for up to 20 hours per week while your classes are in session.
When you hit a scheduled break, like the long summer holiday, you’re free to work full-time. Just make sure you’re enrolled at a Designated Learning Institution (DLI) in a programme that’s at least six months long and leads to a degree, diploma, or certificate. Always, always check your permit itself—it’s the official document that spells out exactly what you can and can’t do.
What’s the Difference Between a Study Permit and a Student Visa?
This is a classic point of confusion, but it’s actually quite simple. Think of it like a concert ticket versus a backstage pass.
- A student visa (which is officially called a Temporary Resident Visa, or TRV) is the “ticket” that gets you to the Canadian border. It’s a sticker in your passport allowing you to travel to and enter the country.
- A study permit is your “backstage pass.” It’s the official document from IRCC that gives you the right to stay in Canada and study at your school for a set amount of time.
If you’re from a country that needs a visa to enter Canada, you’ll automatically get a TRV when your study permit is approved. You need both to get here and get started.
Do master’s and PhD students need a PAL/TAL in 2026?
IRCC says master’s and doctoral students enrolled in degree-granting programs at public DLIs are exempt from the PAL/TAL requirement starting January 1, 2026. Confirm that your program and school fit the exemption before applying.
Does a PAL/TAL guarantee a study permit approval?
No. A PAL/TAL helps IRCC accept the application into processing if it is required, but the officer still reviews finances, study purpose, admissibility, documents and temporary resident intent.
What should I do if my study permit is refused after submitting a PAL/TAL?
Read the refusal reasons carefully, preserve your application record, and get advice before reapplying or considering Federal Court judicial review. A new application should directly fix the officer’s concerns.
My Study Permit Was Refused. What Do I Do Now?
Getting a refusal is a tough pill to swallow, but it’s rarely the end of the road. The very first thing to do is sit down and carefully read the refusal letter. The immigration officer will explain exactly why they weren’t convinced.
Usually, it comes down to a couple of common issues: not showing enough money to support yourself, or the officer not being convinced you’ll actually go home after you graduate. Your job is to find new documents and evidence that directly fix those specific problems and then put together a much stronger application.
A refusal isn’t a final “no.” It’s feedback. It shows you exactly where your application was weak so you can go back and make it stronger. Understanding the officer’s logic is your first step to building a winning case next time.
In more complicated cases, you might have the option to challenge the decision in the Federal Court of Canada. This is a serious legal step, so it’s crucial to get professional advice before heading down that path. If you find yourself in this situation, finding an experienced immigration lawyer near you can give you the clear, strategic guidance you need to figure out your next move.
Trying to figure out study permits, deal with a refusal, or launch an appeal can be overwhelming. At UL Lawyers, we live and breathe this stuff. We serve clients across Ontario, including Burlington and all of the GTA. We offer dedicated legal support to help students clear these hurdles and get on with their education in Canada. Get in touch with us today for a consultation.